OpenCV C++记录(六):轮廓提取
OpenCV轮廓
轮廓提取任务是许多图像分析、识别的必要步骤,前置工作是将灰度图进行二值化,然后基于二值化图进行轮廓提取,本文记录了OpenCV一系列轮廓相关的分析手段,包括基本轮廓提取、绘制、外接多边形/椭圆/圆、多轮廓的交、并、差填充等。
轮廓提取与绘制
cv提供了强大的基本轮廓识别和绘制功能:
1
2
3
4
5
6
7
8
9
10
11
12
13
14
15
16
17
18
19
20
21
22
23
24
void cv::findContours(InputArray image, OutputArrayOfArrays contours,
OutputArray hierarchy, int mode,
int method, Point offset = Point())
参数:
image:输入的二值图像
contours:轮廓信息,一般为点的二维vector,第一维是数组,代表第i个轮廓的点集,第二维是某个轮廓的第j个点
hierarchy:轮廓层次信息,一般是关于Vec4i的vector,第一维代表第i个轮廓;
第二维0、1、2、3分别代表当前轮廓的同级Next轮廓编号,同级Previous轮廓编号,第一个子轮廓编号、父轮廓的编号。
mode:轮廓检索模式,即:
- RETR_TREE:从顶级轮廓到子轮廓按完整层次整理;
- RETR_EXTERNAL:只检验外部轮廓;
- RETR_LIST:不建立等级关系;
- RETR_CCOMP:仅二级层次,如果具有第三级轮廓,该轮廓会作为顶层轮廓。
method:轮廓近似方法,与性能
- CHAIN_APPROX_SIMPLE:仅保留轮廓中直线端点,性能高;
- CHAIN_APPROX_NONE:完整保留轮廓每一个点,性能略低但准确。
- CHAIN_APPROX_TC89_L1/CHAIN_APPROX_TC89_KCOS:基于L1距离、Cos距离的Teh-Chin近似算法;
offset:偏移量,两个方向会添加对应的坐标值作为偏移量;
1 | void cv::drawContours(InputOutputArray image, InputArrayOfArrays contours, |
值得注意的是,findContours是对二值化图提取轮廓,得到的输出自然也是二值化的轮廓,这个轮廓并不是原图的轮廓信息,原图应该是灰度图的轮廓信息,因此不能将二者混淆,通过二值化轮廓和原图做简单运算即可从原图提取到轮廓,这些轮廓信息可能会被处理后再放回原图,是常用的边缘处理手法,以下代码展示了这个过程:
1
2
3
4
5
6
7
8
9
10
11
12
13
14
15
16
17
18
19
20
21
22
23
24
25
26
27
28
29
30
31
32
33
34
35
36
37
38
39
40
41
42
43
44
45
46
47
using namespace std;
using namespace cv;
int main(){
Mat input = imread("D:/Documents/Desktop/note/bluef.jpeg");
Mat gray;
cv::cvtColor(input,gray,COLOR_BGR2GRAY); //灰度图
Mat inputBinary;
threshold(gray, inputBinary, 155, 255, THRESH_BINARY);
imshow("inputBinary",inputBinary); //二值化图
vector<vector<Point>> contours;
vector<Vec4i> hierarchy;
findContours(inputBinary,contours,hierarchy,RETR_TREE,CHAIN_APPROX_SIMPLE); //提取基本轮廓
//绘制轮廓
// for(int i=0; i<contours.size(); i++){
// drawContours(input,contours,i,Scalar(0,0,255));
// }
//循环等效于-1写法:
drawContours(input,contours,-1,Scalar(0,0,255));
//提取下标为2的轮廓,这是轮廓的二值化作为掩图
Mat mask = Mat::zeros(input.size(),CV_8UC1);
drawContours(mask,contours,2,Scalar(255));
imshow("mask",mask);
//通过掩图拿到原图的灰图部分
Mat extract_part;
gray.copyTo(extract_part,mask);
imshow("extract_part",extract_part);
///dosomething to extract_part......
//合并回去:
c::subtract(gray,mask,gray);
cv::bitwise_or(gray,extract_part,gray);
cout <<"done";
cv::waitKey(0);
cv::destroyAllWindows();
return 0;
}
点集格式
在介绍一系列画图函数前说明一下,在cv中除了常用的vector<Point>可以代表点的数组,Mat类型也可以用于表示点数组,例如使用Mat绘制一个三角形:
1
2
3
4
5
6
7
8
9
10
11Mat_<int> triangle = (Mat_<int>(3,2)<<
0,0,
500,10,
10,500
);
for(int i=0; i<3; i++){
line(rawPicColor,Point(triangle.at<int>(i,0),triangle.at<int>(i,1)),\
Point(triangle.at<int>((i+1)%3,0),triangle.at<int>((i+1)%3,1)),Scalar(0,255,0),2,LINE_AA);
}
imshow("Triangle",rawPicColor);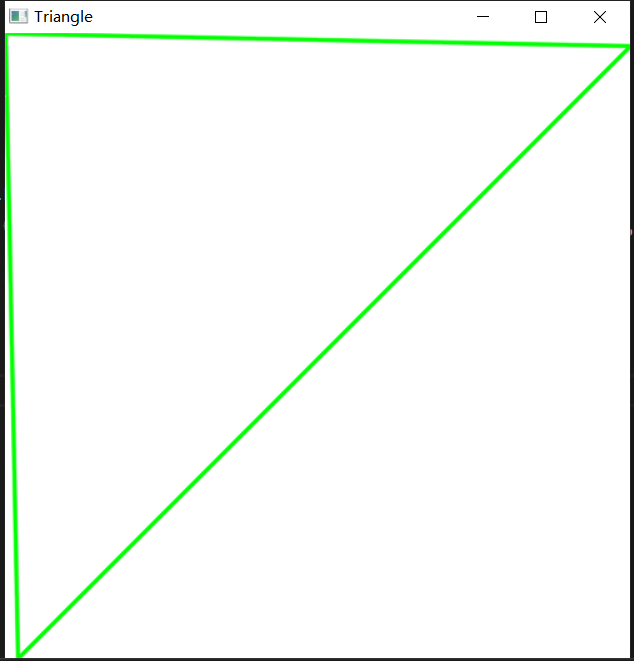
可见Mat的索引是比较麻烦的,,对于闭合图形还涉及取余来解析点,因此不如Point数组常用,下面基本基于Point数组描述,只需要知道各函数也支持Mat作为点集类型。
轮廓特征
轮廓面积、长度
cv::contourArea计算某个轮廓围成的面积,第二个参数默认为false,代表无方向;若为true,轮廓逆时针为正面积,顺时针为负面积;
cv::arcLength计算某个轮廓的长度,第二个参数orient为true代表封闭轮廓,false代表开放轮廓。
1
2
3
4
5
6
7
8
9
10
11
12cv::contourArea(vector<Point>contours[0], bool orient); //轮廓面积
cout<<cv::arcLength(vector<Point>contours[i], bool orient); //轮廓长度
example:
for(int i=0; i<contours.size(); i++){ //计算子轮廓面积
if(hierarchy[i][3]==0){
drawContours(rawPicColor, contours , i, Scalar(0,0,255), 4 ,LINE_AA, hierarchy, 0);
cout<<cv::contourArea(contours[i],true)<<"\t";
cout<<cv::arcLength(contours[i],true)<<endl;
}
}
imshow("area",rawPicColor);
近似多边形approxPolyDP
cv::approxPolyDP使用多边形去拟合轮廓的形状:
1
2
3
4
5
6
7
8
9
10
11
12
13
14cv::approxPolyDP(vector<Point> contours[1], vector<Point> appContours, double epsilon, bool orient);
- contours:输入轮廓;
- appContours:输出拟合轮廓;
- epsilon:精度,越小精度越高、点越多,越大精度越差,常和轮廓长度合用调节;
- orient:为true闭合;
example:
vector<Point> appContours;
double epsilon = 0.02 * arcLength(contours[1], true); //精度
cv::approxPolyDP(contours[1],appContours,epsilon,true);
//注意draw接受的是二维
drawContours(rawPicColor,vector<vector<Point>>{appContours},0,Scalar(0,255,0), 2, LINE_AA);
imshow("approx",rawPicColor);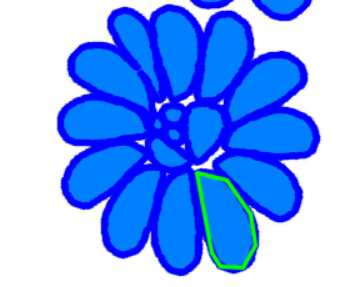
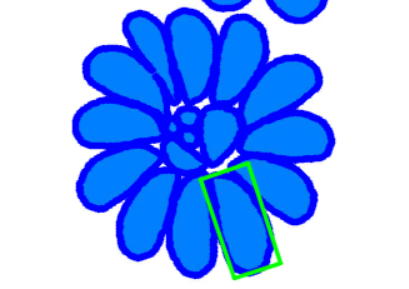
近似直矩形boundingRect
cv::boundingRect返回的近似轮廓是横平竖直的矩形,若需要形态拟合无需正方向应该是使用旋转矩形:
1
2
3
Rect bdRect = boundingRect(contours[1]);
rectangle(rawPicColor,bdRect,Scalar(0,255,0),2,LINE_AA);
imshow("bdRect",rawPicColor);
轮廓外扩细节问题
这里要注意一个细节问题,使用findContours和drawContours时,默认内轮廓就是零像素和非零像素的边界,所以Contour是零像素的集合,意味着画轮廓的着色位置总是在第一圈零像素上。但是,如果对这个内轮廓进行取直矩形,如cv::Rect rect = boundingRect(contours[1]),rect取的是内轮廓外面一圈(着色位置落在第一圈非零像素上),而不是Contour本身组成的近似矩形,即rect是含有非零像素的,所以如果需求是取零像素区域的近似矩形,在boundingRect之后,应该对rect进行收缩处理:
1
2
//取矩形时会比轮廓大一圈,提前收缩回来像素对比才准确
rect = cv::Rect(rect.x + 1, rect.y + 1, rect.width -2, rect.height -2);
近似旋转矩形minAreaRect
可以提取端点再使用line函数绘制;
1
2
3
4
5
6
7
8
9
RotatedRect rtRect = minAreaRect(contours[1]); //输出旋转矩形
//绘制旋转矩形:
Point2f rtPoint[4]; //提取点要求是Point2f
rtRect.points(rtPoint);
for(int i=0; i<4; i++){ //绘制
line(rawPicColor,rtPoint[i],rtPoint[(i+1)%4],Scalar(0,255,0),2,LINE_AA);
}
imshow("rtRect",rawPicColor);
也可以使用cv::polylines来绘制封闭形状:
1
2
3
4
5
6
7
cv::Mat drawC = cv::Mat(input.size(), CV_8UC3, Scalar(255,255,255));
cv::RotatedRect rect = cv::minAreaRect(contours[2]);
Point2f origPoint[4];
rect.points(origPoint);
vector<cv::Point> vporig{origPoint, origPoint+4}; //数据变vector点集
cv::polylines(drawC, vporig, true, Scalar(255,0,0), 3); //true代表绘制的点集的封闭的
minArea旋转特性
minArea能够获取轮廓的旋转矩形,旋转矩形存在角度,一开始对矩形的角度理解不清,导致看一段代码看得云里雾里:
1
2
3
4
5
6
7
8
9
10
11
12
cv::RotatedRect modifyRect(minRect);
if (minRect.size.width > minRect.size.height){
modifyRect.angle = 90 - minRect.angle;
}
else{
modifyRect.angle *= -1;
}
if (minRect.size.width > minRect.size.height){
modifyRect.size.width = minRect.size.height;
modifyRect.size.height = minRect.size.width;
}modifyRect.angle,指的是最靠左侧的边与水平方向的夹角,通过minRect.size.height和minRect.size.width可以获取其高和宽,当角度为0,竖直方向的肯定被视为高,所以最靠右侧的边始终是高:
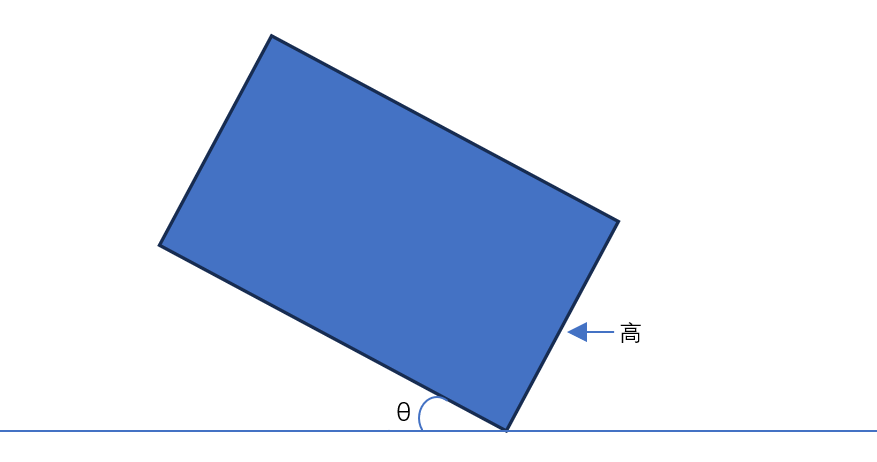
所以上述代码的目的是无论输入的宽和高如何,总是确保将长边作为高,而且短边的水平夹角为原始角度modifyRect.angle,即确保旋转矩形总是类似竖放的。
近似凸包convexHull
即返回给定轮廓点的凸多边形近似,如果轮廓本身就是全凸的,效果实际上和近似多边形类似。
1
2
3
4
5
6
7
8
9
10
11
12
13
14
15
16
void convexHull(
vector<Point> points, // 输入点集
vector<Point> hull, // 输出的凸包点集
bool clockwise = false, // 凸包点集的顺序(顺时针或逆时针,与面积计算等有关)
bool returnPoints = true // 是否返回点的索引
);
//example:
vector<Point>cvhContours;
convexHull(contours[1],cvhContours,false,true);
//凸包绘制
for(int i=0; i<cvhContours.size(); i++){
line(rawPicColor,cvhContours[i], cvhContours[(i+1)%cvhContours.size()], Scalar(0,255,0),2,LINE_AA);
}
imshow("cvhContours",rawPicColor);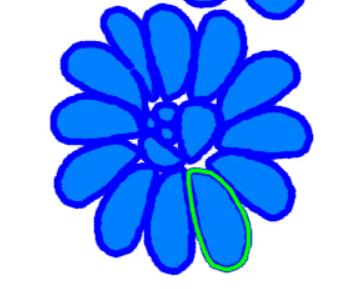
最小外接圆minEnclosingCircle
cv::minEnclosingCircle接受轮廓点集contours[1],返回圆心Point2f center和半径float radius:
1
2
3
4
5
6
7
8minEnclosingCircle(contours[1],center,radius);
//example:
Point2f center;
float radius;
minEnclosingCircle(contours[1],center,radius);
circle(rawPicColor,center,radius,Scalar(0,255,0),2,LINE_AA);
imshow("ccircle",rawPicColor);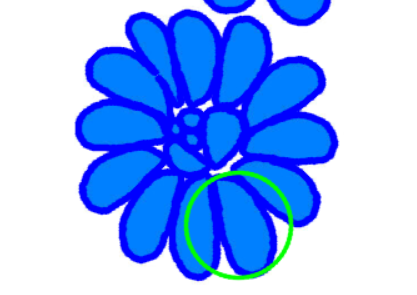
最小外接椭圆fitEllipse
这里的旋转矩阵和minAreaRect得到的旋转矩阵并非完全重合,其底层算法应该存在一定差异。
1
2
3
RotatedRect rtRect = fitEllipse(contours[2]); //返回旋转矩阵
ellipse(rawPicColor,rtRect, Scalar(0,255,0),2,LINE_AA);
imshow("ellipse",rawPicColor);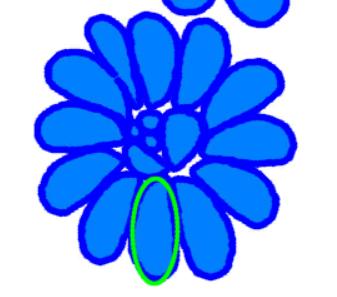
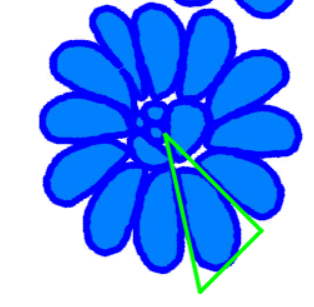
最小外接三角形minEnclosingTriangle
1 | vector<Point> triPoint; |
轮廓填充fillPoly
对于圆形、椭圆形、矩形有自己的绘图函数,使用-1指定线宽代表填充,对于点集绘制的多边形,可以使用cv::fillPoly绘制任意形状的多边形:
1
2
3
4
5
6
7
8
9
10
11
12
13
14
15
16void cv::fillPoly(
InputOutputArray img, // 输入输出图像
InputArrayOfArrays pts, // 多边形点集
const Scalar& color, // 填充颜色
int lineType = LINE_8, // 线型
int shift = 0, // 坐标精度(小数的位数)
Point offset = Point() // 偏移量
);
example:
Mat botPic(500,500,CV_8UC3,Scalar(255,255,255)); //底图
vector<Point> vp{{10,20},{110,320},{220,110}};
fillPoly(botPic,vector<vector<Point>>{vp},Scalar(0,255,0),LINE_AA);
imshow("fill",botPic);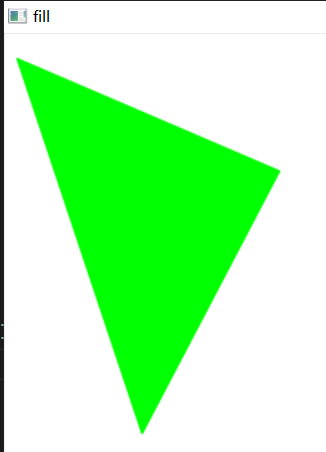
图形交并差fillPoly
对不同对象求交、并、差等运算是一个重要问题,图形学引入了各种各样的库来处理这些问题,这里fillPoly也可以用于生成掩图,实现简单的图形运算。
注意新建点集时,必须按照图形顺时针/逆时针的方式指定轮廓点,否则可能出现意外的连线错误,如绘制矩形可能变成两个三角形,vector<Point> pic1{{10,20},{10,320},{220,20},{220,320}}:
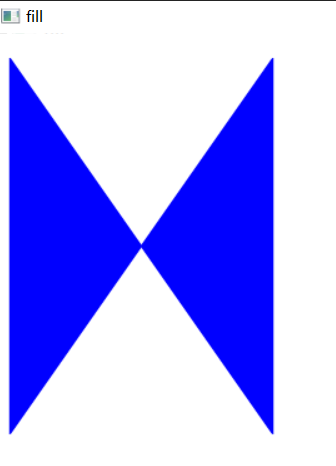
当fillPoly同时接受一个列表的两个轮廓对象时,实际上填充的是它们的差集:
1 | Mat botPic(500,500,CV_8UC3,Scalar(255,255,255)); //底图 |
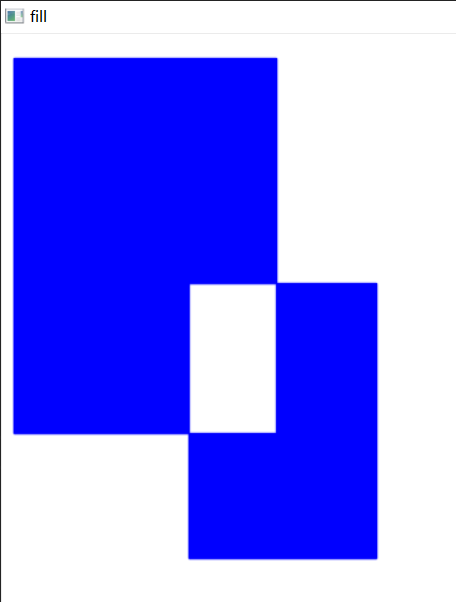
求并也很简单,只需要将他们各自填充即可:
1
2fillPoly(botPic,vector<vector<Point>>{pic1},Scalar(255,0,0),LINE_AA);
fillPoly(botPic,vector<vector<Point>>{pic2},Scalar(255,0,0),LINE_AA);
交集可以使用掩图实现: 1
2
3
4
5
6
7
8
9
10
11
12
13
14
15
16
17Mat botPic(500,500,CV_8UC3,Scalar(255,255,255));
vector<Point> pic1{{10,20},{10,320},{220,320},{220,20},};
vector<Point> pic2{{150,200},{300,200},{300,420},{150,420}};
Mat pic1_mask = Mat::zeros(botPic.size(),CV_8UC1);
Mat pic2_mask = Mat::zeros(botPic.size(),CV_8UC1);
fillPoly(pic1_mask,pic1,Scalar(255),LINE_AA);
fillPoly(pic2_mask,pic2,Scalar(255),LINE_AA);
Mat intersection_mask;
bitwise_and(pic1_mask,pic2_mask,intersection_mask);
botPic.setTo(Scalar(0,0,255),pic1_mask); //非交use red
botPic.setTo(Scalar(0,0,255),pic2_mask);
botPic.setTo(Scalar(255,0,0),intersection_mask); //intersection_mask为白,设置为对应颜色
imshow("intersection",botPic);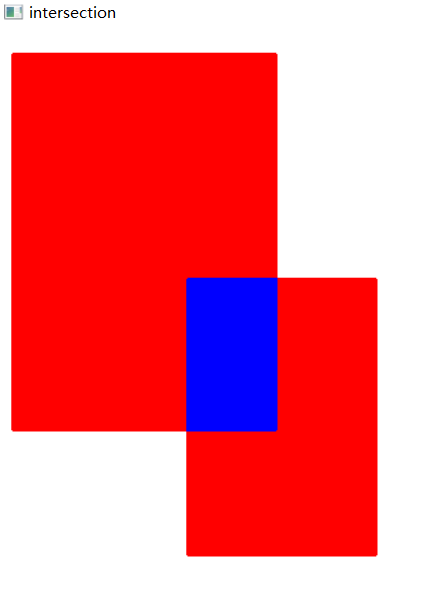
参考链接: